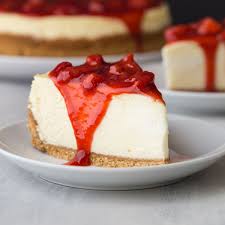
Keto Banana Bread

This is an awesome treat, and good desert, best yet sugar free, and keto!

Ingredients

2 Cups Almond Flour

1/4 Cup Coconut Flour

1 TBS Baking Powder

2 TSP Cinnamon

1/2 TSP Xanthan Gum

1/4 Salt

1/2 Cup Of Butter (Softened)

2/3 Cup Of Stevia

4 Large Eggs (At Room Temperture)

1/2 Cup Of Almond MIlk

2 TSP Banana Extract

1 Cup Of Chopped Walnuts (Optional)

Instructions

Mix your dry ingredients, other than the Stevia and B walnuts. Mix it up really good.

Add your butter to a bowl,. Add your Stevia and with a blender blend until its creamy, Add your eggs. Make sure you add 1 at a time and keep mixing. Then add the rest of the wet ingredients. Start adding your dry ingredients. Add in half of your walnuts, and mix well.

Take a bread pan and line it with parchment paper. Add your bread into the pan. Make sure you make it smooth. Add the rest of the walnuts to the top.

Preheat your oven to 350F for 35 to 40 minutes. Put some aluminum foil to the top. Bake for another 25 minutes.

Take a tooth pick and insert into the middle to make sure its. Cool before serving.

Keto Diabetic Friendly Homemade Marshmallows and Rice Crispy Squares

This is a great treat, and easy to make, you need a bit of patience, but it will be well worth it and it will be great for any diet!

Ingredients

1 Cup Of Water
1 Cup Of Water
2/3 Cup Of Stevia
2 TSP Cream Of Tarter
2 Pack Of Gelatin
6 Cups Of Keto Rice Crispys
4 TSP Of Vanilla Extract
3 TBS Of Unsalted Butter

Marshmallows

In a pan greese the bottom, and then put some parchment paper on top of that and then greese that as well.

In a sauce pan put 1/2 cup of water, and then a 1/2 cup of water in a large mixing bowl, and then put one pack of gelatin into the mixing bowl and let it rest

In your sauce pan put your Stevia in and stir it up, add your cream of tarter, and remember to always stir, and bring this up to a raging bowl.

In your mixing bowl, take a mixer and start mixing it and start to add in your sauce mix, and you want to do tis slowly, and keep mixing this and you will need to do this for a while, adding in 4 TSP of vanilla extract.

Keep mixing this and eventually it will start to thicken up and you want to pour it into your pan before it gets totally thick so just before it starts to peak take it out and pour it into your pan and let it sit for at least 8 hours.

If you were just making homemade marshmallows after 8 hours cut them and separate them maybe put a bit of Stevia on top and let them sit another 8 hours.

This process you have to pay attention, especially if your using a very high powered mixer.

After 8 hours, just cut them up, you don’t need to be fancy because they are just about to be melted again any ways.

The Squares

Now in a pot, take a bit of oil, then 3 TBS of butter, and let this melt down a bit.

Put in your marshmellows and let this melt in the potjust becareful to not let it burn.

Now slowly start adding your Rice Crispys until its all coated and not at all liquidly and then pour into a pan and let it sit and cool down (Do not sit this in the fridge until it has cooled down.)

Peanut Butter Chocolate Chip Cookies

Completely sugar free, complexly awesome taste!

Phase 1 Ingredients

1 Large Egg
A Sprinkle Of Salt
1 Cup Of Smooth Peanut Butter
1/2 Cup Of Brown Stevia
1/2 Cup Sugar Free Chocolate Chips

Phase 2 Instructions

Preheat your oven to 375 Degrees, and get 2 baking sheets with parchment paper ready.

In a mixing bowl mix your peanut butter, salt, brown Stevia and chocolate chips until combined.

Scoop the cookie dough over the sheets, 2 inches apart, use a fork to flatten each cookie just a bit to a criss cross pattern.

Bake the cookies one at a time for 8 to 10 minutes, and when done let them cool for 20 minutes, and just repeat for the last tray.

A lot of these ingredients are easy to find but if you can’t find them www.Amazon.com has a lot of them. We hope you like this recipe, we loved this a lot!

Apple Pie

This is a great recipe, yes there will be sugar in it as apples do have sugar in them, but using sweeteners like Stevia will help that out a lot, this is actually a lot more simple to make than you’d think, and it turned out great!

Phase 1 Ingredients

Apple Pie Crust

2 Cup Of Flour
1 Quarter TSP Of Your Sugar Substitute
A Sprinkle Of NO-Salt
A Cup Of Water
2 TBS Of Oil

Pie Filling

5 Cups Of Apples Pealed And Sliced.
2 Sticks Of Butter
2 TBS Of Cinnimon
3 TBS Of Water
2 TBS Of Nutmeg
1 TBS Cloves
1 Cup Of Stevia
TBS Of Water
TPS Of Cornstarch

Phase 2 The Crust

Add 1 cup of flour right into your pie dish, 1 Quarter TSP of your sugar substitute, a bit of No-Salt, take a fork and mix it add in a bit of water, Add in 2 TBS Of Oil mix the mixture until it clumps and take your hand and make your crust.

Preheat your oven to 400 degrees, and then bake for 8 minutes.

Phase 3 the Pie

Soak your apples in some water,

In a sauce pan melt 2 sticks of butter, add 2 TBS of cinnimon and stir it in, then add 3 TBS of water, and stir again, Add 2 TBS of nutmeg and 1 TBS of cloves, add 1 cup of stevia, and stir, now add your apples in, you need to keep stirring.

Take a TBS of Water add a TPS of cornstarch and mix it together to make a slurry.

Add your slurry to the apple mix.

Keep mixing this until it isn’t runny and thick.

Once that is done take it off the heat and let it cool all the way down.

Put your pie into the crust, and then the top part make sure to cut some slits on top for ventilation, sprinkle the top with cinnimon.

Pre heat your oven to 350 and bake for 30 minutes!

This is a very easy and simple recipe and it tastes so amazing! We hope you like it!

Pinapple Orange Jam

This is an awesome and easy recipe, it tastes great and is easy to it is rewarding to know what you made something more healthy and tasty than what you can get in a store!

Ingredients

3 Oranges
2 cups water
1/2 cup of Sugar Free Maple Syrup
2 TBS Tajin
2 TBS Nutmeg
2 TBS Cinnamon
2 TBS Allspice
2 TBS Cloves
1 Pineapple
A Package of pectin
1 TBS Lemon juice

Phase 1 – Orange Rind

Peel your oranges. Take the peels and slice them up into small chunks the kind you would want to see in a good marmalade, Save the rest of the oranges because we are going to use these later.

Take a pot and boil your water. When the water is at a boiling point boil your rind for 10 minutes. Remove it and then rinse it out.

Dump your water from the pot and boil new water. When it is at a boiling point boil the rind yet again for 10 minutes. Remove and rinse. Repeat this one more time.

In a large frying pan put in 2 cups of water, your orange rind, and bring this to a boil. Add in your maple syrup and mix and cook for 5 minutes. Set aside.

Phase 2 – Prep Work

Core and peel your pineapple. Make sure you get rid of all the eyes and core.

Take the remainder of your oranges that you’ve already peeled and cut them down. DE-seed and get rid of the white stuff as much as you can.

Phase 3 – Making a Sauce

In a large blender add your pineapple, oranges, spices, and pectin, and lemon juice. Blend it up really good until its almost like a sauce.

Phase 4 – Jam Making Time

Pour your mix into a pan and boil low and slow until it starts to come into the consistency that you want. Slowly add your rind mix with the syrup.

When your jam has the consistency that you want take it off the heat and start pouring into your containers!

This is a great recipe, and you can double the ingredients to make a larger batch to share with your friends as you see we’ve done in the video. We hope you liked this, we know we did!

Homemade Jello Gummies

I’m sorry for the video quality, it should do the job, but we were short staff today, but this is an awesome treat, easy to make and best yet you don’t need a stove or oven, just a microwave and the ingredients.

Phase 1 Ingredients

Sugar free Jello
1 Pack Gelatin
Half a cup of cold water
Quarter cup of cold water
Candied decorations (Optional)

Phase 2 Putting It All Together

Take a half a cup of cold water and sprinkle in 1 pack of gelitan slowly.

Stir and let this sit for 5 minutes.

Stir in the quarter cup of cold water.

Put this in your microwave for 1 minute.

Pour in your Jello mix.

Pour in a little bit of the candied decorations and stir.

Pour into your mold and put in the freezer for 2 hours.

Take it out gently and your done!

A very fast and easy treat to make, with very little effort!

We used the sugar free Jello, if you are not worried about your sugars, regular is fine, and you don’t need the candied decorations.

We hope you like this, we love it, mind you yes I am aware that this is Jello, we have made this the long hard way from making homemade Jello, but this is easy and everyone can make this!

Homemade Dark Chocolate

This is a super easy and quick recipe, only 4 ingreidents!

1 cup of Coconut oil

1 cup of Coco Powder

1/2 cup of honey (or any other sweetener you want

And a few drops of vanilla extract.

in a small pot put everything in and melt and mix everything, when it starts to bubble pour it into your mold, the easiest might be an ice cube maker.

Freeze for 30 minutes to an hour, take it out and wrap in tin foil, and your done!

Easy quick and man it tastes so great!

Homemade Frostys

Ever want to grab a Frosty but there is no Wendys close by, or just too expensive? Well there is a super easy way to make and this is how.

1. Freeze some Cool Whip.

2. Once frozen Put 75% of the Cool Whip into a blender.

3. Put a can of Sweetend Condensed Milk in the blender.

4. Fill the rest of the blender with chocolate milk and blend.

5. Pour the contents of the blender into some containers and put into the freezer.

6. Pour into some glasses after a few hours and enjoy.

Simple easy and man it tastes good, please note this is not a healthy drink, but, it is good, and ok to try once and a long while.