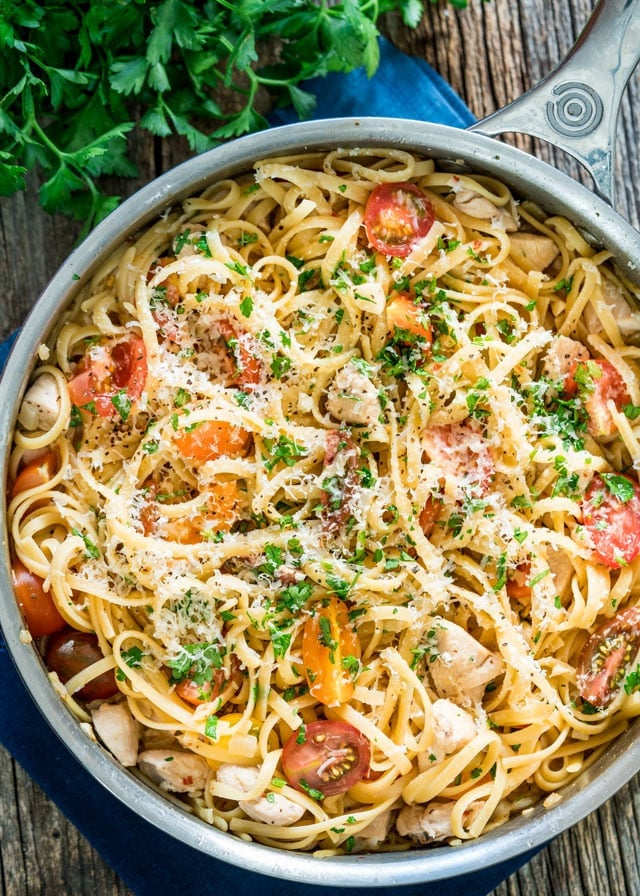
This is a simple and easy recipe, we think everyone should be able to make this, and we know that everyone will enjoy it!
Phase 1. Flattening The Beef
Take a baking tray, and line it with parchment paper.
Add your extra lean beef (or any beef you have on hand) and flatten it over the parchment paper.
Make sure you have it as flat and even as you can.
But them in a shape so they are a bit bigger than the slider buns your going to use, the beef will shrink.
Take a chop stick or something else and poke 5 holes per burger.
Put more parchment paper on top to cover it.
Put it in the freezer for at least 4 hours.
Phase 2. Cut The Beef
Seperate the pattis from each other than put back into the freezer until ready.
Phase 3. Prepping Cooking
Cut up some onion, lots of onion.
If you like your burgers hot, cut up some jalopino too.
Cut your buns in half.
Cut your cheese (If you want.)
Phase 4. Cooking
Put your onion over your pan and jalopino too if your choosing to use it.
Put some water in and let it heat up.
Put the burgers on top of the onion and cook til done.
Phase 5. Putting it together.
Take a burger out, put it into the bottom of a bun.
Make sure you take some onion and jalopino on top.
Add your cheese and close the bun and your done!
We found this to be a yummy and easy recipe, using the water to cook instead of oil elevated the taste and made it sooo much more tasty, we hope you enjoyed this let us know, hit that like, share and subscribe button, thank you.
This is a very simple and easy recipe, tastes great and honestly so healthy, everyone should be able to make this! BTW if your not a fan of onions you can leave this out, if you really wanted to make this vegan you can leave the scallops out too, if you want you can replace the scallops with any other type of seafood!
Phase 1 The Scallops
Cook your scallops until they are completely cooked, leave no room for them to be under cooked, and this is very serious, when they are done leave them to the side.
Phase 2 The Noodles
Make your noodles you’ve selected as per directions.
Phase 3 Chickpeas
Put a can of chickpeas into a frying pan, juice from the can in all, we are going to cook these on medium heat. We are going to mix some Tumeric Cardimon Onion Powder Smoked Paprika and Onion A few table spoons of BBQ Sauce for flavor Cumming Chilli Powder Stir this all the way through These should be cooked for 3-4 minutes.
Phase 4 The Sauce
In a food processor put a large onion or 2 small ones in Then load your cooked chickpeas Process them down until they are pureed Into a large frying pan or wok add 2 cans of crushed tomatoes (If not just use the food procesor or blender to get them pureed for you. Add 1 can of pinapples in juice and all You want to stir frequently everything has to be even. A few spoons of your favorite sea food sauce Add in your chickpea and onion puree And yes especially stir this in, this part is very important Add your scallops to the mix. Add plenty of cheese, add in gradually so that it melts in. Let this simmer for a 4 to 5 minutes.
Phase 5 Mixing Together
Add some noodles to the bowl Drown your sauce into the bowl and mix well If you want you can serve with garlic bread and should be very tasty!
This is very easily one of our favorite recipes we have ever made, it tastes great and was easy and quick to make, we hope you like what we served!
This was an awesome, fun, easy and simple recipe, one I think everyone can enjoy, and everyone can make this!
You start with 4 litters of milk Take a quarter drinking cup of milk in a cup Pour the rest of the milk in a large pot and start cooking on medium heat and keeps stiring it take 2 cups of plain yogurt into your cup of milk, and stir it up Squeeze the juice of 1 lemon Put in a bit of salt Just before it starts boiling put in your milk yogurt mix Soon it will start boiling, and you will see curds come up on top
Take a pot with some cheese cloth put on top and start scooping the curds into the cheese cloth
When its all in the cloth squeeze the liquid out to make your cheese dry.
Store in a dark warmish place for 24 hours.
After 24 hours put in the fridge and your good to go!
Super easy, good for salads, making poutine, a spread, or just a good snack, we hope you liked this!
Ever try Taco Bell and get disappointed? Too salty? To mushy, well it sounds to me as if someone needs to make their own, well, we did too, and this turned out amazing, and honestly it was quick simple and easy, very little effort and trust me it turned out amazing!
Phase 1 Chili Time!
Oil your pan lightly Add in some ground beef Add in 1 large or 2 small onions diced up Break burger up so its very small Keep mixing the burger and onion.
Add the following spices to your own taste Mexican oregino Ground cuming Ground black pepper Smoked Paprika and Onion Chili powder Mix the spices up fully and ensure that all your meat gets some love
Add a few drops of apple cider vinegar
Add 2 cups of water
Keep stiring as you add ingredients
Take a glass and add some corn starch in to make a slurry to thicken your sauce and add it to your mix
Cover and simmer for 5 minutes
Add 1 can of refried beans
Add 1 can of tomato paste
Add some adobe chipolte peppers (preferably diced up, if not, take some time and dice the peppers up first.) If you can’t handle heat then please do not add them.
Let simmer for 10 minutes
Shred up half a block of cheese, (Do not buy pre shredded cheese, as it has a higher melting point and is has lots of chemicals and is not as good quality, or even better yet buy some higher quality cheese!)
Start slowly adding the cheese into the mix until cheese is melted, and then add more until its completely melted in.
Take it off the heat.
Phase 2 Serving
Take a tortilla wrap
Add some of the mix in the middle, add some sour cream, even better yet, Mexican sour cream, and then wrap it up, and serve it!
We hope you enjoyed this, if you made this let us know what you think, we really love it, and honestly one of the best dishes we made yet!
This is our homemade turkey burger, it has an amazing taste, and very flavorful, and yet so easy to make and this will be one of your families favorite go to burgers! We are sure you are going to enjoy this! Best part you don’t need an egg, nor do you need any bread crumbs to make this stay together!
Phase 1 Patty Time
In a bowl mix in the following
1 pound of ground turkey Worcestershire sauce Sweet soya sauce Liquid smoke Smoked Paprika Maple Bacon spice Fresh Black Pepper Onion Powder Lo-Salt (or No Salt)
Take your time and mix this with clean hands until everything has been mixed in properly and then this should make 3 patties.
Set the patties in the freezer for at least 15 to 30 minutes to firm up.
Phase 2 Lets get saucy!
In a bowl mix the following.
Mayo Apple Cyder Vinegar Mustard Sweet Thai Chili sauce Mix this very well.
Phase 3 Lets get cooking
Cook the burgers on the stove top with some oil until the burgers are completely cooked, you don’t want to food poison anyone!
Phase 4 Putting things together!
You want to serve this with a nice bun, using some lettuce, cheese, onion and your done!
We hope you enjoy this, we really love this burger, and yes we do like our beef and all, but we need something new every now and again, and this is 100% worth it!
By the way if you haven’t please support us by watching our videos hitting the like share and subscribe button, thank you!
Baked Ziti can be compared to lausuagna but there are differences, and it can taste absolutely amazing, and a very fun dish, doesn’t take a lot of prep time and can be quite tasty, and a crowd pleaser.
You can buy your marinara sauce, or you can buy it, see the link below to our homemade marinara sauce we made.
So if you have a food processor run these through it to get it almost puried, if you don’t then chop it up as finely as you can.
1 Large onion, a whole garlic, roasted peppers (This is optional, you don’t have to have this.)
Phase 2 Cheese Please!
You will want to grade a lot of parmesan cheese, (You can buy this pre graded.) and your Mozzarella, (please do not buy pre graded.) You are going to need enough of this.
Phase 3 The Noodles
Normally this recipe calls for Ziti noodles, however these are not always easy to get, and in fact, I’ve never been able to find them, penne noodles work just fine.
Cook your noodles either near done, or done according to the package directions, when done drain the water, however do not drain them as we need the starch on it later to help the sauce to stick to the noodles.
Phase 4 The Sauce
Oil your pot and put your onions and ground beef in, cook until the onions are getting cooked, then add the garlic and then roasted garlic , put salt and pepper in.
Put 5 cups of marinara sauce in and mix well.
Put a container of robata cheese in and mix well.
Add your pasta and mix it.
On a casserole dish put a small spread of your meat sauce no noodles.
This way you won’t need to grease our pan.
Pre Heat your oven to 350 degrees.
Now put half of your meat sauce into the pan.
Cover in half your parmesan cheese, and your mozzarella
Now put the rest of your meat sauce in, and cover the rest with cheese.
Now bake it for 25 minutes!
When done leave sit for at least 10 minutes before serving, (other wise your going to have a lot of loss flavor)
Serve!
We hope you like this, its one of our favorite dishes, and we through we would come back to this and share with you our favorite!
How often do we go to our favorite breakfast or coffee joint for a breakfast sandwich, in Canada we go to Tim Hortons a lot and we enjoy our coffee and our breakfast there, but it gets costly, and often we can do it our selves, and make it better.
You can choose your own meat, your own cheese, and make it taste amazing, and the best part its what you want, and should be cheaper and healtheir!
So lets break it all down.
Cut an English Muffin in half and spread some mayo over it, if you want to make your own mayo mix you can do that, chipolete sauce would work great here!
Heat up your pan and put an egg on it breaking the yolks and cooking it with pepper and salt (lo or no sodium salt if you can.)
Remove from the stove when cooked and the toast the English Muffin over the stove too, and remove it.
Place your Eggs on the bottom part of the English Muffin.
Put some hot sauce, we like Sweet Thai Franks Hot Sauce on ours.
Put some grated cheese over it.
Put a sliced onion over it.
Close it up and serve.
This was easy, simple, quick and cheap, and honestly worth making for your breakfast, and it really levels your cooking up!
This is an excellent snack, it can be un healthy, and quite hot if you let it be, and you can customize it the way you want, in this recipe I am making a simple base, yes there is a bit of addition to mine, but not a whole lot, we are trying to present this in a healthier way so we are avoiding doing the butter (Yes I am aware that it does add to the flavor, but its unhealthy and I’m not sure its nessasary with all that we have in it already.
Phase 1. Corn
Cook your corn, its normal to use white corn, however not everyone can get access to it, we couldn’t find it at all.
If your using canned corn drain first, other wise cook your corn, we used a bit of low sodium salt, so me peper and tajin.
Let your corn cool off before proceeding.
Phase 2. Putting it all together.
This was easy wasn’t it?
Put some corn in a cup, now presentation is not important, not everyone will care that much.
Put 2 spoon fulls of cream cheese.
Put 2 good squirts of mayo. (Please do not use Miracle Whip)
Put a bit of lime juice over it.
Put some of your favorite hot sauce, we used Franks Sweet Thai Chilli, my absolute favorite!
Then finally add a few sprinkles of Parmesan cheese and thats it your good to go!
This is a great little snack, very tasty and easy to make, a good pleaser, we hope you enjoy it!
Sandwiches are great, but ever wonder why yours looks bad and get stuck buying one just to get one that looks and tastes great?
I’ve been guilty of it, and I know so have you, but here is the thing, you have to consider the quality of meat your using, the type of bread or bun your using, and sauce and how its going together, it really does mater.
So lets take some time and think about it.
Phase 1. The meat!
The meat is a big part of a sandwich, and often if you go to the store and buy sandwich meat, its thin, not as flavorful and just not the best quality around, so what do we do?
In our video here we used chicken, but you can use pork or a beef product, season it to what you like, pepper, salt if you must (I like low sodium myself), maybe some honey, and bake it until its cooked , but you want it moist.
When done take it out of the oven, let it cool and then slice it thin, or however you like it, many of us don’t have a meat slicer and thats ok, (who has room for that anyways.), when done put it in the fridge for a bit.
Phase 2. Veggies.
Cut up your veggies nice and thin, but remember to use veggies that are dry, cukes and tomatoes are nice and all, but they can often be wet and can make your sandwich a soggy mess, so if your going to use tomatoes make sure you are not putting seeds in, this will ruin it, take those out. you want lettuce or spinach or something similar. make sure to have several varieties or your sandwich is going to be boring.
Phase 3. Sauce.
Directly on the inside of the bun on both sides, I like just plain mayo over that, it acts like a lubricant, and helps keep the bread from going soggy, you can do a mayo mix with hot sauce, or mustard or other things to give it a bit more flavor.
You can use other sauces like BBQ sauces, or a vinaigrette, or other tasty sauces you might want to include.
Phase 4. Cheese
You need cheese, plain and simple and to be honest you do not want cheesewiz, you want something of quality, you can get cheese slices, but honestly that brings you back to just making bland crap, so you can buy a block of cheese and cut that up, or go to the deli and buy a really nice block of cheese, trust me the flavor this brings is so electric and amazing, and trust me the cheese that you get from the deli is actual real cheese, and if you’ve never had it, trust me you need to.
Phase 5. Bread
You could use whtie bread, but when you buy a a good quality sandwich is it on white bread, most often it isn’t, why not choose a multi grain, or even better a nice bun, or roll, after all you want the best quality you can get, and this is going to do it.
Phase 6. Putting it all together!
Ok, so here is the fun part, not the most fun part, that is you eating it.
Take your roll and cut it down the middle, or if its bread just use both slices, but put your mayo, or mayo mix on the bottom of each side, this will act as a lubricant, which helps from keeping the juices getting your bread product
Then put some lettuce on the bottom and layering it nicely.
Now you want to take your meat and start layering that as well, giving it a nice presentation and having enough on it to make you happy.
Now start putting your veggies on it one by one, keeping in mind not to put too many veggies on it as it will make it messy and also hard to close, this isn’t a Subway sub, they do give you lots of veggies, but not a whole lot, and in the end it does look good, but the quality isn’t there.
Now your sauce you want to use, and remember do not over load this, or it is going to be messy, you want to have enough you taste and know its there and are happy, but not so much its going to over flow.
Then your cheese, and you want enough of this, especially if its from the deli.
Then lastly some more lettuce and close your sandwich.
The only thing left to do if you really want, you can put this in a pre heated oven to toast it.
But thats all, try this out some time, and if your someone who would enjoy to bring this to your work for lunch, buy the quantities for the week, and do the math, I bet you its cheaper than buying it every day, and honestly your co workers are going to be jelous!