Baked Beans

Baked beans is a very Atlantic Canadian dish, it can feed a large family, its very easy to make, and can be a great comfort food, and is totally worth making.

Please note that when making this you do want to add bacon, use the lower fat version if you can, and please use the real Canadian bacon like this.

Not the round stuff that is often labeled as Canadian bacon, its not.

It is best to use a slow cooker for this, and plan plenty of time ahead because you do need to soak your beans.

Phase 1 Soak your beans

You want to buy a bag of navy beans and put them in a large container and soak them over night, and this is something that you have to do, do not rush this, it should be soaked no less than 8 hours, preferably 12.

Phase 2 Boil

Take your beans and drain and then rinse them off, clean out any bad ones and disregard them.

Boil them for 30 minutes on medium heat.

Phase 3 Making the beans

Ingredients

  1. Pepper
  2. 1 Cup of warm water
  3. Salt
  4. Cloves
  5. All spice
  6. 1 container of molassis
  7. 1 Cup of brown sugar
  8. Yellow mustard
  9. 2 Diced onions
  10. Maple Syrup
  11. Bacon

Into the slow cooker

  1. Lets put the beans into the slow cooker
  2. As you add things in to the slow cooker stir things very evenly.
  3. Take a large measuring cup, add 1 cup of warm water and then add some pepper, salt, cloves, all spice mix well.
  4. Add the mixture and stir.
  5. Add more water until the beans are almost submerged, but not over the beans just under.
  6. Add 1 cup of brown sugar
  7. Add one small container of molasses, make sure to drain it, it can be a real pain to do.
  8. Add a good amount of mustard, a few good squeezes.
  9. Add 2 diced onions.
  10. Add some maple syrup.
  11. Add some sliced up bacon, if you want it to be crispy bacon make sure to fry it up first.

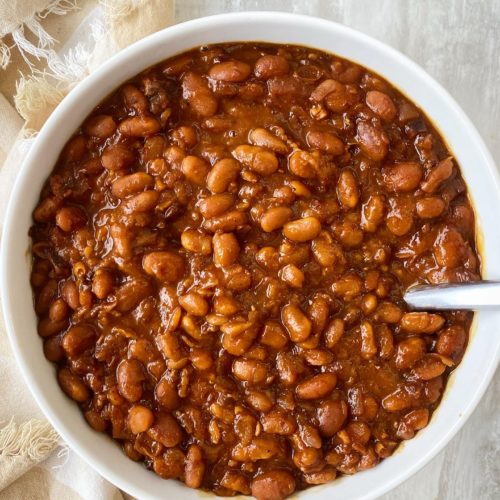
cook this on low on your slow cooker for 8 hours, if you cook this for longer thats ok to, eventually the liquid will reduce and youll end up with an amazing meal, you can top this with more mustard if you want, but what ever you do, do not use ketchup at all! You can serve this with a slice of homemade bread, and if you wish to make this vegan, thats easy just don’t add bacon, or you can always add a vegan alternative.

We hope you enjoy this, we sure do!

Pineapple Curry

Pineapple curry is a great tasting Indian dish that is hot, vegan and tastes absolutely heavenly!

Before serving this I would recommend that you watch who you are serving as someone may have an allergy, or may not be able to handle the heat.

This was fun to make, and didn’t take a whole lot of time to make, it was actually fast, and for this I would I would recommend using a wok.

Phase 1 Ingredients

  1. Chili Sauce
  2. Garlic
  3. Coconut oil
  4. Fresh pineapple
  5. Cinnimon
  6. Smoked Paprika
  7. Garlic powder
  8. Cardimon
  9. Onions
  10. Curry powder

Phase 2 Prep Work

Lets take some time and slice up your onions garlic and pineapple, they should be in bite sized chunks.

Phase 2 Cooking

  1. Start by putting some coconut oil in the wok and letting it turn into oil, some times this is a thicker consistency at the start and needs to melt.
  2. Start adding each ingredient in 1 by one until they are all in, making sure to stir after each add.
  3. Let everything cook out properly and your done, its that simple!

This is a great meal, and very simple and easy to make and should be a major pleaser! You should serve this with rice, and if you want to you can also add cooked chicken with it!

Pink Tacos

Pink Tacos are a great healthy, yes it takes a lot of work, but its well worth the effort, and it is a big way to impress someone with your cooking skills as no one else could imagine taking the time to make, and honestly it tastes amazing!

Ingredients

  1. Cranberries
  2. 3 Cups of water
  3. Cinnimon
  4. Orange Juice
  5. Orange Peels
  6. Hot sauce
  7. 1 Jalopino
  8. Celantro
  9. Can of Mandrines
  10. Can of Peaches
  11. Can of Appricots
  12. Chunky pinapple
  13. Tajin
  14. Lime juice
  15. Fresh Tuna
  16. Salt
  17. Pepper

Phase 1 Cranberry Salsa

  1. In a pot put a bag of cranberries in on medium heat
  2. 3 cups of water
  3. Add some cinnimon
  4. Add some orange juice
  5. Add some peels of some oranges
  6. Add some hot sauce you enjoy
  7. Let simmer for 30 minutes
  8. Remove 75% of the cranberries and blend them, and then combine them and let them sit in the fridge for a while.

Phase 2 Tropical Salsa

  1. Remove the liquid from the Mandarins the peaches, the apricots and pineapples
  2. Add them to a food processor
  3. Chop 1 Jalopino (remove the seeds if you don’t like heat) and add it to the food processor
  4. Add Tajin to the food processor, process the mix, add lime juice and set aside.

Phase 3 Fresh Tuna

  1. We like using fresh tuna for this, its got a great taste and also much healthier
  2. Marinate the tuna with a bit of oil salt and pepper
  3. Cook the tuna the same way you would as a steak just sear it, you don’t want to fully cook it.
  4. Let it rest for 10 minutes, if you don’t the juices and flavor will escape.
  5. Cut it up in very small pieces.

Phase 3 Putting it all together

  1. Where going to get some pink taco shells, (if you can get pink ones, some times there is a lot of false advertising and you don’t get them.)
  2. Start by putting the tropical salsa on the bottom.
  3. Line the next layer up with your tuna.
  4. Finish it up with your cranberry salsa.
  5. Serve it.

We found this to be absolutely delicious and tasty and had so much flavor, and tasted so amazing, when we served it everyone was amazed and surprised, they were first shocked by the name we called it, but in the end, it won them over.

Corn Chowder

Corn Chowder is a simple easy meal, not at all hard, it tastes great, and so simple even a beginner can do this with out a sweat.

As an Atlantic Canadian this is a pretty staple part of our diet, I would recommend you use Russet Potatoes, as they are grown perfect for this.

Ingredients

  1. Bacon
  2. 2 cans of creamed corn
  3. 2 onions
  4. 3 russet potatoes
  5. 1 container of heavy cream (whipping cream)
  6. Celeri
  7. Black pepper

Prepping

  1. Cut up the bacon and put it in a bowl
  2. Slice up the onions, you want these to be very thin
  3. Slice up the potatoes, you want these in cubes
  4. Slice up the celery

Lets get cooking

  1. You want to use a large cooking pot for this, and your going to start by cooking the bacon on the bottom, no oil or greases, bacon produces enough of that, cook it down enough so its cooked but still to the point that its soft.
  2. Add the onion and potatoes, and start cooking them, you want them soft.
  3. Add the cans of cream corn.
  4. Keep mixing this so that its not all stuck to the bottom.
  5. Mix in some pepper.
  6. Start pouring in the milk only to the point that your getting the volume that you want.
  7. Add a lot of black pepper.
  8. Finally add the celery.
  9. Let the chowder simmer and it shouldn’t take too long, and then take it off of the heat.

Thats it, simple and easy and it tastes amazing, best served with crackers, it can be a meal on its own, or you can have it as a side dish, and should taste amazing!

We truly hope you enjoy it!

Cranberry Dijon

Cranberry Dijon is a great condiment, good to use for sandwiches, great for fish, great for a lot of things, so simple and easy, and yet so tangy and delicious and worth having in stock as if you wish to entertain, it will be an eye opener!

Phase 1 Ingredients

  1. Wine
  2. Mustard Seeds
  3. A bag of fresh cranberries
  4. Rice wine vinigar
  5. Onions
  6. Salt
  7. Pepper
  8. Honey
  9. Dijon mustard
  10. Yellow Mustard
  11. Water
  12. Hot sauce

Phase 2 Cooking

  1. In a pot add some wine and a good amount of mustard seeds, let this cook down until soft.
  2. In a food processor cut up some onion and set aside for a few moments.
  3. In a separate pot add a cup or so of water.
  4. Add a bag of cranberries, make sure the water is almost up to the top of the cranberries.
  5. Add some rice wine vinigar.
  6. Add the onions.
  7. Mix well so that its combined.
  8. Add salt.
  9. Add Pepper.
  10. Add some honey, add to your taste.
  11. Add some Dijon mustard.
  12. Add some regular mustard.
  13. Stir some more, and at this point regularly keep stirring up.
  14. Add some hot sauce, what ever you like, don’t make it to hot though, you should be serving this to others do you don’t want to burn them out.
  15. When the pot with the mustard seeds is cooking and the seeds seem like they are nice and soft mix them in with the cranberries and stir well, its important to have them incorporated well.
  16. Cook this until the cranberries get soft and start to no longer be berries and go into a sauce, this can take a while and if its not going to happen for you, remember all stoves are different, you may want to use a blender to help the process.
  17. When this is done cooking, take it off the heat and let cool, it will thicken up and your done, serve with a sandwich or some meats, and this will be an awesome meal.

I hope you enjoy this recipe, this was one of my favorites, try it out, let me know what you think!

Homemade Ice Cap

One of the best delicacies that Canada has to offer is Tim Hortons, while many of us have our own opinions of the place, and the decline of quality that has happened through the years, there are a few things that you have come to accept, 1. A long line up in the drive through, 2. The double double the co worker is going to treat you with, and the demand for an ice cap!

This is a very simple and easy recipe, just takes some time to do.

  1. Make some coffee, use your favorite blend, let it brew and when its done brewing take 3 cups out of the maker and let it cool, (Tip if its winter let it sit outside to cool down.)
  2. Put the coffee in a blender.
  3. Add a few spoons of brown sugar (Or stevia, we use a diabetic friendly type of brown sugar)
  4. Add the normal amount of coffee cream that you would use in 3 cups of coffee (this is you have left overs if you want only 1 cup of an Ice Cap just reduce it by a 3rd.)
  5. Lastly add 1 tray of ice cubes.
  6. Blend that up until you have a good consistency, pour into a cup and serve.
  7. Optional you can add some whip cream and drizzle some chocolate over it, I know my wife would love this more but she is diabetic like me so, the answer was no.

Its that easy, and simple, and this is a Canadian delicacy and its an amazing taste.

Sloppy Aimees

Sloppy Aimees is my take on a Sloppy Joe, just more healthy fun, and much more tasty.

This is fun, easy and very tasty!

Ingredients

  1. 3 Onions
  2. 3 Green Peppers
  3. Garlic
  4. Ground Beef
  5. Pepper
  6. Salt
  7. Worcestershire Sauce
  8. Spaghettis Sauce
  9. Apple Cyder Vinegar
  10. BBQ Sauce
  11. Your choice of hot sauce
  12. Big burger buns

Cooking

  1. Start by chopping up your onion, green pepper and garlic, it would be best if you had a food processor and let it do it for you, more simple and a lot quicker.
  2. In a oiled frying pan start frying up that mix.
  3. Add in your ground beef, breaking it up making sure its very chunky.
  4. As it cooks down its going to reduce.
  5. Add some pepper.
  6. Add some Worcestershire sauce.
  7. Add some spaghetti sauce.
  8. Add some apple cyder vinegar, not a lot but it does help with taste and works with helping your blood sugar and blood pressure.
  9. Add some BBQ Sauce, your favorite flavor.
  10. If you want some hot sauce this is where you add it in, if your sharing the meal, think about how other people will feel about it, you don’t wanna kill anyone.
  11. Mix this all in good, and cook until done, be careful to make sure the meat is well cooked.
  12. Lastly get your but buns ready and put some mix in until it looks like a sloppy joe, but this time make it messy!

This is a meal best served with fries and maybe some veggies, a great pick me up meal, very simple and quick to make, we really hope you enjoy!

Butter Chicken

This is our butter chicken video, one of the older videos, and honestly it was one of my favorites, who doesn’t like butter chicken, it tastes amazing, and you can make it hot, but you don’t have to, and I think anyone who likes Indian food will tell you they love butter chicken.

I would always encourage you to try to make this if you never had it before, as it is one of those dishes that is simply amazing!

A few things to note, when marinating the chicken you can add some plain fat free Greek yogurt, and when it comes to salt there is a low or no sodium salt you can use and it does make a difference.

Phase 1 Marinating the chicken

Ingredients for phase 1

Boneless chicken thighs

Salt

Garlic Powder (or minced garlic)

Ginger Powder (Or minced ginger)

Onion Powder (or minced onion)

(You can optionally add plain Greek yogurt)

Phase 1

  1. Cube up the chicken thighs.
  2. add the above spices and yogurt if your going to use it.
  3. Let this marinate between 20 minutes to 24 hours.
  4. If your going to add some hot peppers or spice the longer its marinated the hotter its going to be and the better flavor youll have!

Phase 2 Gravy part 1

Ingredients for Phase 2

  1. 2 Onions.
  2. Extra virgin olive oil.
  3. A whole garlic.
  4. Garam Masala.

Phase 2

  1. In a large frying pan put the heat on with some extra virgin olive oil let it heat up.
  2. Chop up the onions and garlic.
  3. Add the onions and garlic and we want to get the onion caramalized.
  4. Mix in the garam masala mix.
  5. Mix everything

Phase 3 Cooking the Chicken

This is simple and easy just fry up your chicken, get it fully cooked, you don’t want to be eating bad chicken.

Phase 4 Finishing up

Phase 4 ingredients

  1. Rice wine vinegar
  2. 2 cans of crushed tomatoes
  3. Half a box of butter
  4. Red pepper flakes
  5. Whipping cream

Phase 4

  1. In your pan with the carnalized onions, add some rice wine vinegar.
  2. Add in 2 cans of crushed tomatoes.
  3. Take this portion and add to a blender or food processor to make smooth and then replace back into the pan.
  4. Chop up the butter into smaller sticks and add it into the gravy and make sure the butter is melting down.
  5. Put the cooked chicken in.
  6. Add some red pepper flakes.
  7. Add some whipping cream in.
  8. Make sure to keep stirring.

This is basically it, there are other spices you can add, and you can make keep improving this, and this is a yummy base for making an amazing meal!

I would serve this with rice and some nan bread, and honestly it is an amazing meal! Enjoy Bon Appitite.

Mac n Cheese Casserole

Mac n Cheese Casserole is a great meal, very simple fast and easy, it tastes great and it is a different meal that should please and fill you!

Mac n Cheese is great on its own, and adding to it can be wonderful!

Phase 1 Noodles

Cook your bag and choice of noodles as directed on the package, we like using elbow macaroni!

Phase 2 Ground Beef

For the beef you can use steak or any other type of pork, but then again you can use any type of pork if you want, but you can also use ground meat as well, if you don’t have a food processor then just buy it already ground, I find by choosing your meat to make into ground meat you have a much better quality and all, so it will be more rewarding.

Take your meat and grind it up in the food processor then put it in a oiled pan and add salt pepper and some spices you like and cook it until done.

Phase 3 Tomato Sauce

You can use 1 can of tomato sauce and 1 can of crushed tomatoes, salt pepper and any other sauce you may choose I also added 2 onions a whole garlic that was also put in the food processor mix it well and cook until its bubbling and your set, take it off the burner.

Phase 4 Mix 1

Take a baking pan you can cook with, maybe like a cake pan, and start by putting your cooked and drained noodles and line the bottom with that, and then the meat and then your tomato sauce you just cooked, and mix it all up good, were almost done folks.

Phase 5 Cheese Sauce

Take a frying pan and cut up some butter and a bit of oil so the butter doesnt burn, once the butter is melted, take a half a cup of flour and stir it well so there are no clumps, and this is very important no one wants to bite into a meal and taste clumps of flour, then add 1 and a half cup of milk mix it well, then start adding 2 types of cheese, bit by bit until the cheese is melted in keep stirring so nothing burns once thats finished were very close.

Phase 6 Mix 2 The Final Mix

Now lets take the cheese sauce and pour it on top of the casserole , and now…

Phase 7 Baking

Now make sure your oven is preheated for 375, then bake for 20 minutes, once the 20 minutes is over, your done, but let it set for 10 to 20 min, and your done!

I hope you enjoy this awesome dish.

Spaghetti Squash Pad Thai

Spaghetti Squash Pad Thai is an amazing dish, easy to make with a bit of work at the start, but it is amazing and also very easy to make into a pure vegan dish if you wanted.

This is an absolutely amazing meal, tastes so amazing and very rewarding to eat, and you will be proud of yourself!

Phase 1 Spaghetti Squash

To start preheat your oven to 350 degrees, and get yourself a very sharp knife and cut your squash into quarters.

Clean out the center of the seeds and garbage like you would a pumpkin.

Put it on a baking tray and lightly oil the tops and bottoms of your squash.

Bake it at 350 degrees for 20 minutes.

Once done put it on a cooling tray, and leave it cool off for 30 to 60 minutes, there is no rush on this, as it stays very hot and will burn you.

After the squash is cooled off enough take a fork, maybe 2 and pull the insides apart, like your pulling pulled pork, it will look like spaghetti noodles, very amazing once you see this for the first time.

Put the noodles in a container and set aside.

Phase 2 Chicken

Take 1 chicken break cook it up with pepper, ginger, and if you have low or no sodium salt you can use that too.

Once that is cooked up cut your chicken breast into small pieces.

Remember this is not the main part of the meal, so its not a big deal here, if your looking for a vegan option just leave it out.

Phase 2 veggies

Ingredients

  1. Ginger
  2. Green Peppers
  3. Onions
  4. Cucumbers
  5. Radishes
  6. Peanut butter
  7. Spinach
  8. Hot sauce – you can replace this with another type of sauce or dressing if you are not into heat

Dice your veggies up and then start to fry them with your spinach being last make sure you have the amount of sauce you want, you can use more than 1 type if you want.

Finally put in your spaghetti squash mix it up nice and good.

And now your ready to serve this delicious healthy meal!