Fettuccine Alfredo

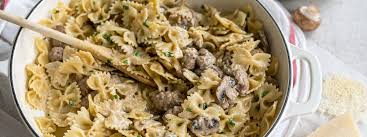
Fettuccine Alfredo is a great dish, tastes amazing and one of the more expensive dishes you can get when you go out to eat, and how awesome would it be to be able to share this with your partner and server her a better dish than she would if you went out! I think your date would be super impressed.

Phase 1 The Noodles.

Cook the noodles as directions tell you, however when your done you want to save a bowl full of the water.

Phase 2 Garlic and Onion

Cut up your garlic and onion, start cooking them to caramelize them with salt and pepper. When they are done put them through a food processor to make them into a puree.

Phase 3 Chicken.

Cube the chicken and then cook it, just salt and pepper is fine.

Put it aside when done.

Phase 4 Lets get cooking!

Lets pour some oil in your wok (or large frying pan)

You want to have half a thing of butter, cut up to make melt easier.

Once the butter is melted or close enough dump some heavy cream in.

Then a bowl full of your pasta water (You can dump the rest now, but the flavor of the water is better than just using regular water.)

Pour in some onion and garlic puree, if you had too much you don’t have to have it all just what you want.

Have some grated cheese, I prefer to use blocks and just shred it on my own and on this I would use 1 block, you can use 2 half blocks of different cheese if you like.)

Add the cheese in slowly until its melted, and its important to keep stiring.

Add your chicken (if you prefer to do this vegan just skip the chicken all together.)

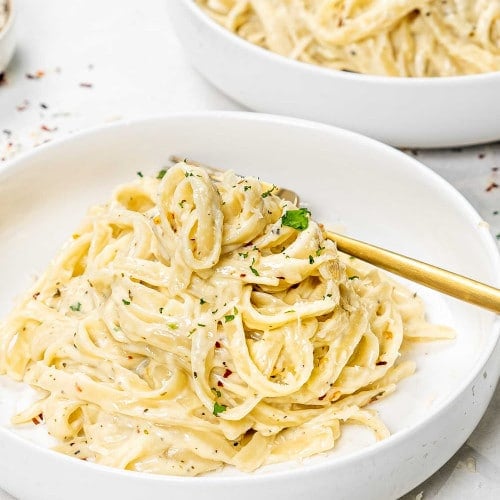
Now add your noodles, and at this point let it cook and simmer for another 5 minutes.

This is an awesome meal, and one to impress, its really not a lot of work, but to someone else it may seem like it, I hope you like, what do you think.

Sweet Thai Chili Tenderloin

Sweet Thai Chili Pork Tenderloin is one of my favorite cuts of meat, and as my friend Tony is famous for saying, eat like a pig,. Well Tony, I think I will, its not a hard thing to cook, takes some time yes, but its well worth it.

In here I’m using cast iron, if your not, it may take a bit longer, and when it comes to baking use a baking tray.

Phase 1 Get the loins ready!

You want to make sure that you are coating all sides with oil, minced ginger and garlic, and paprika salt and pepper.

Phase 2 Sauce me up baby!

In a bowl mix the following.

  1. Honey.
  2. Lo Salt.
  3. Cracked Pepper.
  4. Thai Chili Sauce.
  5. Apple Cyder Vinegar (only a small amount).
  6. Roasted Sesame oil (only a small amount).
  7. Dutch sweet soya sauce.

Mix it all up good,

Phase 3 Sear it.

Piece by piece sear all sides of it until its seared but not cooked.

Pre heat your oven to 400 degrees, (while cooking this take your time and pay attention to your food as everyone’s oven is different and you don’t want to burn this.)

Phase 4 Bake It!

Coat the top with the sauce, and then bake it for 12 minutes, after 12 minutes take it out and flip it and put more sauce over the next side and bake for the final 12 min.

Phase 5 Finishing it up!

Once its done cooking, wait about 10 minutes before doing anything, if you cut into it right away the juices are going to escape and it just won’t taste right!

After 10 minutes start slicing it into thin strips, and your done! Serve this with potatoes, maybe rice, what ever you want, and any veggie you want!

We hope you enjoy this, this is almost my favorite slice of meat ever!

Trashy Aimee’s Nachos

Nachos are a great snack, something easy and simple to eat, and very tasty! This is something you should have out to entertain your friends and family when over, not only tasty but quite healthy too.

Phase 1 Cheese Sauce.

  1. Lets build a rue.
  2. Put some butter oil in a pan, and then add 1/2 cup of flour, and mix that in.
  3. Add some milk in.
  4. Add some very thin cut onions, if you use a food processor it would work best.
  5. Add some minced up garlic, make sure you are mixing this in real well.
  6. Now start adding in pieces or chunks of velvita cheese, (you can use real cheese if you want, we wanted to try velvita once.
  7. Add more milk if needed.
  8. Put some cracked pepper in.
  9. And finally add some jalopino and keep on mixing until the cheese and everything is mixed well, and take off the heat.

Phase 2 Veggies.

Veggies are totally your choice, cut them up and cook them down a bit so they are a bit soft and not too crunchy cut them and cook them, we like jalopino, mushrooms, olives, onions, a celery, green and sweet peppers.

Phase 3 Serving.

Take a baking tray, (maybe tin foil or parchment paper on the bottom, line it up with your favorite nacho chips, cover evenly with your veggies, and then your cheese sauce, you can also add protean if you want, not necessary, but you can!

This is a super easy dish to make, very easy, and customizable, you are in 100% control, maybe you want more veggies, or maybe less, its all on you! You choose what type of cheese you want, this should taste great, and should be a good dish to serve!

Italian Style Spaghettis Sauce

This is a great base for spaghetti sauce, it is done Italian style, and it is tasty, use this as a base, and add from there to your own flavor.

Ingredients

  1. Quarter cup of water.
  2. A TBS of baking soda.
  3. Olive oil.
  4. A whole garlic.
  5. Chili pepper.
  6. 2 Stocks of celery.
  7. 1 Large onion.
  8. Parsley.
  9. Sage.
  10. Oregino.
  11. Black Pepper.
  12. 3 Cans of crushed tomatos.
  13. 2 Cans of tomato paste.

Phase 1 Slurry

In a cup have a quarter cup of water, and add a tablespoon of baking soda, mix well and set aside.

Phase 2 Starting the sauce.

  1. Food process the garlic.
  2. Add a good amount of extra virgin olive oil into a deep frying pan and set the heat on.
  3. Add the garlic to it and start cooking that into the oil, it will infuse it.
  4. While that cooks in the food processor add 2 sticks of celery, some chili peppers, and finally 1 large onion, process this and then put this in a bowl and save it for now.
  5. Add your spices to the pan and mix well.
  6. Add your canned crushed tomatoes.
  7. At this point you want to be constantly stirring especially while you add.
  8. Add your cans of tomato paste.
  9. Now add your veggies.
  10. At this point your nearly done and you need to make sure its cooking down some and mixed well.
  11. Lastly you need to add your slurry of baking soda, and stir a lot now, as it will start to boil over, but this extra step will help you with indigestion and other issues that a high concentration of tomato product will cause you.
  12. Take it off the stove and cool down and a bit and your ready to serve, if your like us and like to save it for later in the week, wait till it is completely cooled down and freeze.

This is it! Now you can make your own meat balls, and noodles, you can add and modify this, but this will give you a great base, and honestly having the slurry will help with anyone with stomach issues, we hope you enjoy!

Pineapple and Chipotle Salsa

This is a great and easy salsa to make, tasty, hot, and flavorful, and best yet, you can make this for a party and have a large amount, and you can be proud of this one as most people won’t make this much effort, or buy their own, this is tasty healthy, and fun!

Phase 1 Ingredients

  1. Chipotle and Adobe Sauce.
  2. 1 Large Onion.
  3. 1 Sweet Pepper.
  4. Some Cardimon.
  5. 3 Cloves of garlic.
  6. 1 Can of tomatoes.
  7. 1 Can of Pinapples.
  8. Some minded ginger.
  9. Some Tajin.
  10. Lime Juice.
  11. Mexican Oregino.
  12. Lo-Salt.
  13. Smoked Paprika.
  14. Cumming.
  15. Black Pepper.
  16. Hot Peppers.

Phase 2 Into the Food Processor

Ok there are some things that need to be processed first, after your done processing the items throw it directly into your blender.

  1. Onions.
  2. Sweet Peppers.
  3. Cardimon.
  4. Garlic.
  5. Pineapple.
  6. Chipolete in Adobe Sauce.
  7. If your using fresh Ginger, do that too.

Phase 3 Blend Blend Blend

Simply put everything into the blender, and you may have to do multiple runs to get it done, if so just put everything into a bowl after a blend, and mix everything well when its done.

Phase 4 Containers

You want to start putting this into containers, and leave it sit in the fridge for at least an hour, and your done!

This is best served with nacho chips, or you can use this with tacos too.

This is an excellent and tasty salsa, and I promise you, everyone will be impressed with you, and think you made the best salsa ever! Your welcome!

Mushroom Pork Pasta

This is an absolutely amazing meal, its not to heavy, and has an amazing taste to it, it is a dish that anyone can make and even learn to make better, this is more a starter guide, so please feel free to modify and make better!

Phase 1 Noodles.

  1. Make some noodles, what ever you want, no right or wrong here, just what your choice is, follow package directions.
  2. When done mix in 2 cups of cream of mushroom soup, add some pepper and set aside.
  3. This is where your choice comes in, you can modify or work on your own mushroom sauce, it can get costly, but if you make your own it will be much better and most likely healthier.

Phase 2 Porkchops.

  1. Cook up your porkchops, only use pepper, I wouldn’t use anything else, just pepper, cook them up until they are done.
  2. When they are done, pepper again, then cut them into small cubes, should be bite size.
  3. Set them aside for now.

Phase 3 The Mushroom Part.

  1. Chop up some mushrooms
  2. Put 2 Onions, and 3 cloves of garlic in the food processor
  3. Put the Mushrooms and onions and garlic into an oiled frying pan.
  4. Mix them up add some pepper.
  5. Add another 2 cans of cream of mushroom soup.
  6. Add the Porkchops.

Phase 4 Corn.

  1. Cook up some corn any way you want!

Phase 5 Lets Make A Meal

  1. On your plate put some of the pasta over it, crack some black pepper.
  2. Put some porkchops over top.
  3. Put some corn on the side and your done!

This is a great light meal, nothing to heavy, and should taste amazing, you can use sausages instead of porkchops if you want, you can explore different soups, or mushroom sauces, or make your own, its not that hard to do!

We hope you enjoy this meal, we sure did!

Cranberry Dijon

Cranberry Dijon is a great condiment, good to use for sandwiches, great for fish, great for a lot of things, so simple and easy, and yet so tangy and delicious and worth having in stock as if you wish to entertain, it will be an eye opener!

Phase 1 Ingredients

  1. Wine
  2. Mustard Seeds
  3. A bag of fresh cranberries
  4. Rice wine vinigar
  5. Onions
  6. Salt
  7. Pepper
  8. Honey
  9. Dijon mustard
  10. Yellow Mustard
  11. Water
  12. Hot sauce

Phase 2 Cooking

  1. In a pot add some wine and a good amount of mustard seeds, let this cook down until soft.
  2. In a food processor cut up some onion and set aside for a few moments.
  3. In a separate pot add a cup or so of water.
  4. Add a bag of cranberries, make sure the water is almost up to the top of the cranberries.
  5. Add some rice wine vinigar.
  6. Add the onions.
  7. Mix well so that its combined.
  8. Add salt.
  9. Add Pepper.
  10. Add some honey, add to your taste.
  11. Add some Dijon mustard.
  12. Add some regular mustard.
  13. Stir some more, and at this point regularly keep stirring up.
  14. Add some hot sauce, what ever you like, don’t make it to hot though, you should be serving this to others do you don’t want to burn them out.
  15. When the pot with the mustard seeds is cooking and the seeds seem like they are nice and soft mix them in with the cranberries and stir well, its important to have them incorporated well.
  16. Cook this until the cranberries get soft and start to no longer be berries and go into a sauce, this can take a while and if its not going to happen for you, remember all stoves are different, you may want to use a blender to help the process.
  17. When this is done cooking, take it off the heat and let cool, it will thicken up and your done, serve with a sandwich or some meats, and this will be an awesome meal.

I hope you enjoy this recipe, this was one of my favorites, try it out, let me know what you think!