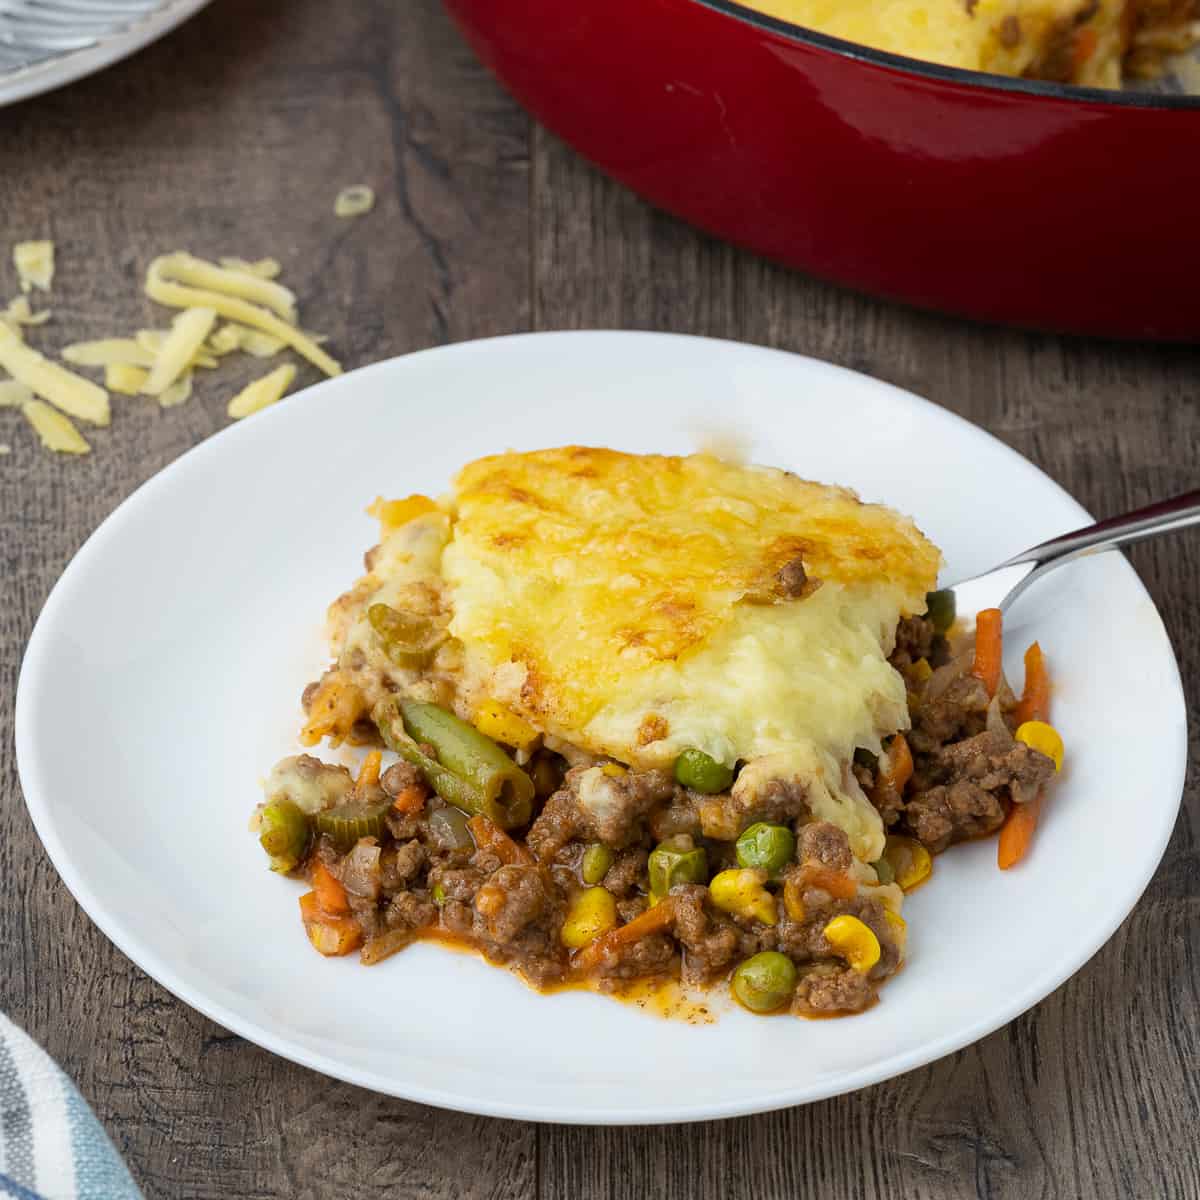
Mac & Cheese

In Canada growing up, one of the most popular meals you would look forward to was Kraft Dinner, to our neighbors to the south they would just simply call it Mac and Cheese, making this homemade is so much better, and tastes sooooo amazing, its worth the time and effort we promise!

Phase 1 Noodles.

You can use what ever noodles you want, its your choice, make one you feel a sauce will stick to rather easily, make them as per its directions.

When the noodles are all cooked drain them, don’t rinse them, this will make the sauce incredibly hard to stick to, and you want it sticky so leave that noodle starch on.

Phase 2 Making a Rue.

So in another pot you want to add some margarine, or butter, its your choice butter is a better choice, but we understand butter can be super expensive, and also not always something you have available.

You then want to add some flour, maybe half a cup and mix it to add it into the butter and make sure you get this well mixed or your going to wind up with clumps of flour in your mouth, it doesn’t taste good, I can promise you!

Add in 2 cans of coconut milk and stir that around.

Now take 2 types of cheese, maybe half a block of 2 cheeses, choose the cheese you like and start to slowly add it in and stir it, (You need to constantly stir this or it will burn) add more cheese after what you added has melted in and keep doing this until all your cheese is incorporated.

Taste your sauce make sure it tastes the way you want it, you may have to add more cheese in.

When its finished pour it into the noodles, and stir it well, the only other thing you may want to add is fresh cracked pepper, but honestly it should be good enough!

We hope you like this, you can ask around, many people will say Kraft Dinner is Crap Dinner, but they will all love Homemade Mac and Cheese! We hope you do too.

BBQ Chicken Pizza

BBQ Chicken Pizza just happens to be one of my wife’s favorite pizzas, she really enjoys it,. a lot, so this is one I end up making a lot for her.

Pizza is fun to make, you can buy your crust, you can make it, and I would encourage you to get a bread maker, with the price of bread these days making your own would be so much more simple and cheaper, and making pizza dough is so much easier that way.

In this recipe I’m going to let you choose how you want your own dough, I did not include a dough making recipe as I use a bread maker, and I’m aware that not everyone does.

So lets take some chicken breast chunk it up and start cooking with it, use any spice you want, its more your taste, you can make it hot, or not the choice is yours, Make sure your using some BBQ sauce as you cook it. I would say no salt, and use pepper and garlic to it.

Make sure your chickens is fully cooked.

At this time I would go ahead and pre heat your oven to 500 degrees.

Now on your pizza dough, add a layer of BBQ Sauce, now this sauce should be something you really enjoy a good flavored BBQ Sauce will go a long way instead of just a cheap flavorless one, we are not going to be using a tomato based sauce for this just a BBQ Sauce so lets make it good.

Put your chicken over it so there is a good coverage of it.

Add some chopped up onion green pepper and mushrooms over it.

And finish off with some nice shredded cheese (Please shred this your self, pre bought is not healthy and also more expensive so its not worth the money.

When the oven is done pre heating, bake the pizza for 20 minutes, or when nice and golden (Keep an eye on it, every oven is different.)

Thats it, let the pizza cool a bit before digging in, give it at least 5 to 10 minutes, then cut it up and enjoy.

We hope you enjoy this, and try it sometime, Aimee loves sharing this one.

BTW just a side note, yes Pineapple does belong on pizza, js.

Fettuccine Alfredo

Fettuccine Alfredo is a great dish, tastes amazing and one of the more expensive dishes you can get when you go out to eat, and how awesome would it be to be able to share this with your partner and server her a better dish than she would if you went out! I think your date would be super impressed.

Phase 1 The Noodles.

Cook the noodles as directions tell you, however when your done you want to save a bowl full of the water.

Phase 2 Garlic and Onion

Cut up your garlic and onion, start cooking them to caramelize them with salt and pepper. When they are done put them through a food processor to make them into a puree.

Phase 3 Chicken.

Cube the chicken and then cook it, just salt and pepper is fine.

Put it aside when done.

Phase 4 Lets get cooking!

Lets pour some oil in your wok (or large frying pan)

You want to have half a thing of butter, cut up to make melt easier.

Once the butter is melted or close enough dump some heavy cream in.

Then a bowl full of your pasta water (You can dump the rest now, but the flavor of the water is better than just using regular water.)

Pour in some onion and garlic puree, if you had too much you don’t have to have it all just what you want.

Have some grated cheese, I prefer to use blocks and just shred it on my own and on this I would use 1 block, you can use 2 half blocks of different cheese if you like.)

Add the cheese in slowly until its melted, and its important to keep stiring.

Add your chicken (if you prefer to do this vegan just skip the chicken all together.)

Now add your noodles, and at this point let it cook and simmer for another 5 minutes.

This is an awesome meal, and one to impress, its really not a lot of work, but to someone else it may seem like it, I hope you like, what do you think.

Trashy Aimee’s Nachos

Nachos are a great snack, something easy and simple to eat, and very tasty! This is something you should have out to entertain your friends and family when over, not only tasty but quite healthy too.

Phase 1 Cheese Sauce.

  1. Lets build a rue.
  2. Put some butter oil in a pan, and then add 1/2 cup of flour, and mix that in.
  3. Add some milk in.
  4. Add some very thin cut onions, if you use a food processor it would work best.
  5. Add some minced up garlic, make sure you are mixing this in real well.
  6. Now start adding in pieces or chunks of velvita cheese, (you can use real cheese if you want, we wanted to try velvita once.
  7. Add more milk if needed.
  8. Put some cracked pepper in.
  9. And finally add some jalopino and keep on mixing until the cheese and everything is mixed well, and take off the heat.

Phase 2 Veggies.

Veggies are totally your choice, cut them up and cook them down a bit so they are a bit soft and not too crunchy cut them and cook them, we like jalopino, mushrooms, olives, onions, a celery, green and sweet peppers.

Phase 3 Serving.

Take a baking tray, (maybe tin foil or parchment paper on the bottom, line it up with your favorite nacho chips, cover evenly with your veggies, and then your cheese sauce, you can also add protean if you want, not necessary, but you can!

This is a super easy dish to make, very easy, and customizable, you are in 100% control, maybe you want more veggies, or maybe less, its all on you! You choose what type of cheese you want, this should taste great, and should be a good dish to serve!

Breakfast Burritos

This is a super simple and easy recipe, and can honestly taste amazing and can give you a great start of your day for breakfast!

Phase 1 Ingredients.

  1. Italian assuages
  2. Cheese
  3. 4 eggs
  4. Green onions
  5. Green Pepper
  6. Jalopinios
  7. Red peppers
  8. Onion
  9. Salsa
  10. Tortillas

Phase 2 Prep.

Cut all your veggies, if you don’t want your burrito to be too hot, remove the seeds from the jalopino

Cut the sassuages down super small pieces.

Phase 3 Eggs.

Take your eggs and put them in a bowl and scramble them with some pepper and some grated cheese, (By the way grate it yourself, don’t buy it pre shredded.) set this aside from now.

Phase 4 Cooking.

Start by cooking your sauces, make sure they are fully cooked, then set them aside.

Cook your scrambled eggs up nice and then set them aside.

Cook your veggies up and set them aside, were almost ready guys!

Phase 5 making the burrito!

Open a tortilla up, and then spread a bit of salsa over it.

Put some scrambled egg over it, then some assuages, and then finally some veggie mix.

Finally some more salsa, then wrap it up, and your good to go.

This can be a very easy and healthy meal, super tasty super fun to make and eat!

We hope you enjoy!

Bison Burger

Ever wonder what the best burger is? Is it Wagu, it probably is, but honestly its far out of most peoples price range, and isn’t so easy to find or afford, with out blowing your whole pay check on one meal, there is an alternative, and that is Bison, Bison is very regulated, and farmers are not allowed to do the same thing they do with cattle which means that there are no growth hormones’ or any other chemical, so bison is a lot better for you, along with the fact that it is very lean, so it one of the best tasting burgers you can get for your money hands down.

This is one reason you want a very high performance food processor, when Aimee and I want ground beef, we don’t buy ground beef, we buy steak, roast or other meats and grind it into ground beef.

Some times when you find Bison meat, its not ground for you, but rather steaks, or cubes, so if you want burgers you have to grind it yourself, and this is why having a good food processor is important, so you can make your own ground beef.

If you never had Bison before I urge you to take a moment and try this recipe as you won’t be disappointed, this is absolutely the best burger your ever going to eat.

Phase 1 Wheres the Beef

Take your bison meat and simply put it into the food processor, no spices at all, just pure meat, grind it up until its a consistency of ground beef.

Take the meat out and start forming them into patties, we like smash burgers so we just made Bison balls.

You want to leave this sit at room temperature for about 10 minutes before you cook, in the mean time oil a frying pan up and heat it up so when your ready to cook its hot and waiting.

While we are waiting for the patties to come to room temperature we shall make some sauce.

Phase 2 Sauce Me!

In a bowl pour in a lot of mayo, (don’t worry you can save this for future use to.)

put in a small amount of apple cyder vinegar

Put in a bit of ketchup

Put in some mustard

I would put some dill pickles in the food processor and then put this in too.

And give it a good mix and make sure its all incorporated.

Phase 3 Cook the burgers

Fry up your burgers on the last flip put on a slice of good quality cheese, you took your time to make such a high quality burger you want to make sure your using good cheese, don’t cheap out here.

Phase 4 Putting it together

Ok, so its time to put this all together, grab your favorite bun and lets layer.

First we are going to put some lettuce then a bit of sauce.

Your burger, and if you want some more cheese, do her up.

More sauce, tomato, onion, and lettuce and finally the bun.

Thats it folks, your friends should be jelous you have the best burger around, and I promise you, if you serve this to your friends and family, they will absolutely think your the best cook in the world!

You can add some hot sauce to your burger sauce if you want, but personally I don’t think its the best idea in the world, to me it distracts from the flavor of the meat,

Service this with some corn and some homemade French fries!

I hope you enjoy this, drop me a line if you have made this, let me know what you think!

Mac n Cheese Casserole

Mac n Cheese Casserole is a great meal, very simple fast and easy, it tastes great and it is a different meal that should please and fill you!

Mac n Cheese is great on its own, and adding to it can be wonderful!

Phase 1 Noodles

Cook your bag and choice of noodles as directed on the package, we like using elbow macaroni!

Phase 2 Ground Beef

For the beef you can use steak or any other type of pork, but then again you can use any type of pork if you want, but you can also use ground meat as well, if you don’t have a food processor then just buy it already ground, I find by choosing your meat to make into ground meat you have a much better quality and all, so it will be more rewarding.

Take your meat and grind it up in the food processor then put it in a oiled pan and add salt pepper and some spices you like and cook it until done.

Phase 3 Tomato Sauce

You can use 1 can of tomato sauce and 1 can of crushed tomatoes, salt pepper and any other sauce you may choose I also added 2 onions a whole garlic that was also put in the food processor mix it well and cook until its bubbling and your set, take it off the burner.

Phase 4 Mix 1

Take a baking pan you can cook with, maybe like a cake pan, and start by putting your cooked and drained noodles and line the bottom with that, and then the meat and then your tomato sauce you just cooked, and mix it all up good, were almost done folks.

Phase 5 Cheese Sauce

Take a frying pan and cut up some butter and a bit of oil so the butter doesnt burn, once the butter is melted, take a half a cup of flour and stir it well so there are no clumps, and this is very important no one wants to bite into a meal and taste clumps of flour, then add 1 and a half cup of milk mix it well, then start adding 2 types of cheese, bit by bit until the cheese is melted in keep stirring so nothing burns once thats finished were very close.

Phase 6 Mix 2 The Final Mix

Now lets take the cheese sauce and pour it on top of the casserole , and now…

Phase 7 Baking

Now make sure your oven is preheated for 375, then bake for 20 minutes, once the 20 minutes is over, your done, but let it set for 10 to 20 min, and your done!

I hope you enjoy this awesome dish.